Step-by-step Guide to Setting Up DHCP Client on MikroTik
Setting up DHCP Client on MikroTik enables automatic acquisition of IP addresses and other network settings from a DHCP server, simplifying network management.
خلاصه تخصصی مقاله
Setting up DHCP Client on MikroTik enables automatic acquisition of IP addresses and other network settings from a DHCP server, simplifying network management.
موضوعات اصلی: DHCP، Client، address، Server، interface، network
Prerequisites for Setting Up DHCP Client on MikroTik
To configure DHCP Client on MikroTik devices and obtain an IP address automatically from a DHCP Server, a few prerequisites are required to ensure proper configuration.
- MikroTik device with a RouterOS version that supports DHCP Client
- Physical connection to a network where a DHCP server is active
- An active DHCP Server in the network
- Properly configured network ports
- Familiarity with DHCP Server settings (if you manage it)
- Access to MikroTik user interface (WinBox or WebFig)
- Identify the network interface to configure
How to Set Up DHCP Client on MikroTik
Follow these steps to enable DHCP Client on MikroTik devices and automatically obtain an IP address from the DHCP Server.
Access RouterOS
Start by accessing RouterOS. This can be done via:
- WinBox – MikroTik’s dedicated tool for router access.
- WebFig – Web interface accessible through a browser.
- SSH – Command-line access via SSH.
Configure the Network Interface
After logging in to RouterOS, locate the network interface on which you want to enable DHCP Client. This interface is usually Ethernet or Wi‑Fi and may vary by setup.
To identify the network interface, go to Interfaces in the UI and select the interface you want to use for obtaining an IP address from the DHCP Server.
Enable DHCP Client
To enable DHCP Client on the chosen interface, do the following:
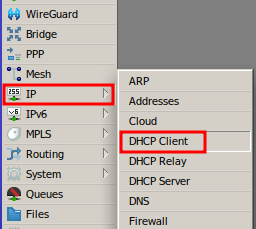
- Go to IP and select DHCP Client.
- In the new window, click the + to create a new DHCP Client.
- In the General tab, from the Interface list, choose the interface identified earlier (e.g., ether1 or wlan1).
- Ensure Use Peer DNS is enabled so DNS is obtained automatically from the DHCP Server.
- Save the settings by clicking OK.
Obtain IP Address from DHCP Server
After completing the steps above, the device will automatically receive an IP address from the DHCP Server. To verify, navigate to IP > DHCP Client and check the interface status. If configured correctly, the status should show as Bound.
Advanced DHCP Client Configuration
In this section, we cover advanced settings for the DHCP Client. After initial setup, you may need configuration for DNS, Gateway, Lease Time, Static IP Address, and IP Pool, as well as Subnet Mask.
DNS and Gateway Settings
DNS and Gateway are key parts of the DHCP Client configuration. These settings help ensure proper access to the Internet and other network resources.
DNS Settings
When DHCP Client is active, DNS information is typically received from the DHCP Server. If needed, DNS can be manually changed. Go to IP > DNS and enter desired DNS servers. You can also enable Allow Remote Requests to make the MikroTik act as a DNS server for other devices.
Gateway Settings
To set a default gateway, review the gateway address received from the DHCP Server and adjust if necessary. Go to IP > Routes and enter the default gateway address there.
Lease Time
Lease Time is the duration the DHCP Server assigns the IP address. To change it, go to IP > DHCP Client, select the active DHCP Client, and adjust the Lease Time value. The default is often 1d.
Static IP Address
To assign a fixed IP from DHCP, create a Static Lease. Go to IP > DHCP Client, select the active DHCP Client, switch to the Leases tab, locate the device, and choose Make Static. The device will always receive the same IP.
IP Pool and Subnet Mask
IP Pool is the range of addresses the DHCP Server uses to assign addresses. To create or modify a pool, go to IP > Pool and add a new pool by specifying a name, address range, and mask. The Subnet Mask is typically determined by the DHCP Server, but you can adjust it manually by going to IP > Addresses and entering the address with a mask (e.g., 192.168.1.1/24).
Static vs Dynamic IP Address Roles in DHCP Client Configuration
Static IP Address
A static IP address is a fixed address assigned to a device and remains the same across reboots. It is commonly used for devices that must always be reachable at a fixed address.
Dynamic IP Address
A dynamic IP address is temporarily assigned by the DHCP Server and may change after the lease expires. In this guide, the DHCP Client typically obtains a dynamic IP that may vary with each connection.
Summary
Setting up DHCP Client on MikroTik, or more precisely configuring DHCP in RouterOS, is a fundamental step for connecting devices to the network and obtaining IP addresses automatically from the DHCP Server. This straightforward process allows administrators to configure devices without manual IP management. After accessing RouterOS and identifying the network interface, enable the DHCP Client and obtain an IP address. Advanced settings such as DNS, Gateway, Lease Time, Static IP Address, and IP Pool can tailor the setup to network needs.
By using these configurations, MikroTik devices automatically obtain IP addresses from the DHCP Server, enabling efficient network management without complex manual setups. This approach is useful for home, office, and larger projects, contributing to better stability and resource management.
For evaluating stability, security, and maintenance of this infrastructure, you can refer to the network support guidance.
برای ارزیابی پایداری، امنیت و نگهداری این زیرساخت، راهنمای پشتیبانی شبکه را نیز مطالعه کنید.